Running a Private AKS Cluster with Private ACR and Self-Hosted DevOps Agents

Building a modern, secure, and scalable CI/CD pipeline often involves integrating various technologies and tools. In this article, I share my journey of running a private Azure Kubernetes Service (AKS) cluster with a private Azure Container Registry (ACR), setting up self-hosted build agents on Kubernetes with KEDA, building container images with Podman directly inside Kubernetes pods, and leveraging the Helm OCI registry on the private ACR.
Overview
The architecture I implemented features several key components:
- Private AKS Cluster: Ensures that the orchestration layer is secure and isolated.
- Private ACR: Stores container images and Helm charts securely.
- Self-Hosted Agents: These agents run on Kubernetes and manage the build pipelines.
- KEDA (Kubernetes Event-Driven Autoscaling): Dynamically scales the self-hosted agents based on demand.
- Podman Inside Kubernetes: Allows building container images directly within the Kubernetes pods.
- Helm OCI Registry: Integrates with the private ACR to manage and deploy Helm charts seamlessly.
Each component plays a critical role in ensuring a robust and secure CI/CD pipeline.
Setting Up a Private AKS Cluster with Private ACR
The foundation of the solution is a private AKS cluster, which was provisioned to limit network exposure and improve security. By pairing AKS with a private ACR, I ensured that both the container runtime and the image repository are securely isolated from the public internet.
Before diving into the details of integrating self-hosted agents, KEDA, and Podman within your Kubernetes workflows, it’s important to ensure that you have the following prerequisites in place:
- Private AKS Cluster: You should already have a private AKS cluster deployed. This setup ensures that your Kubernetes API server is only accessible from within your network, enhancing the overall security of your cluster. For guidance on deploying a private AKS cluster, refer to the Private Clusters documentation.
- Private Container Registry (ACR): Ensure that you have created a private Azure Container Registry with the endpoint and DNS properly configured so that your AKS cluster can pull container images seamlessly. More details on setting up a private ACR with Private Link can be found in the Container Registry Private Link documentation.
- ACR Integration with AKS: Your AKS cluster should be attached to your private container registry. This integration simplifies image pulling by allowing your cluster to authenticate and access the registry without additional credentials. For instructions on how to integrate your AKS cluster with the ACR, see the Cluster-Container Registry Integration documentation.
Having these prerequisites in place ensures that you have a secure foundation for the subsequent steps of deploying self-hosted agents, utilizing KEDA for autoscaling, and building container images with Podman inside your Kubernetes environment.
Deploying Self-Hosted Agents on Kubernetes with KEDA
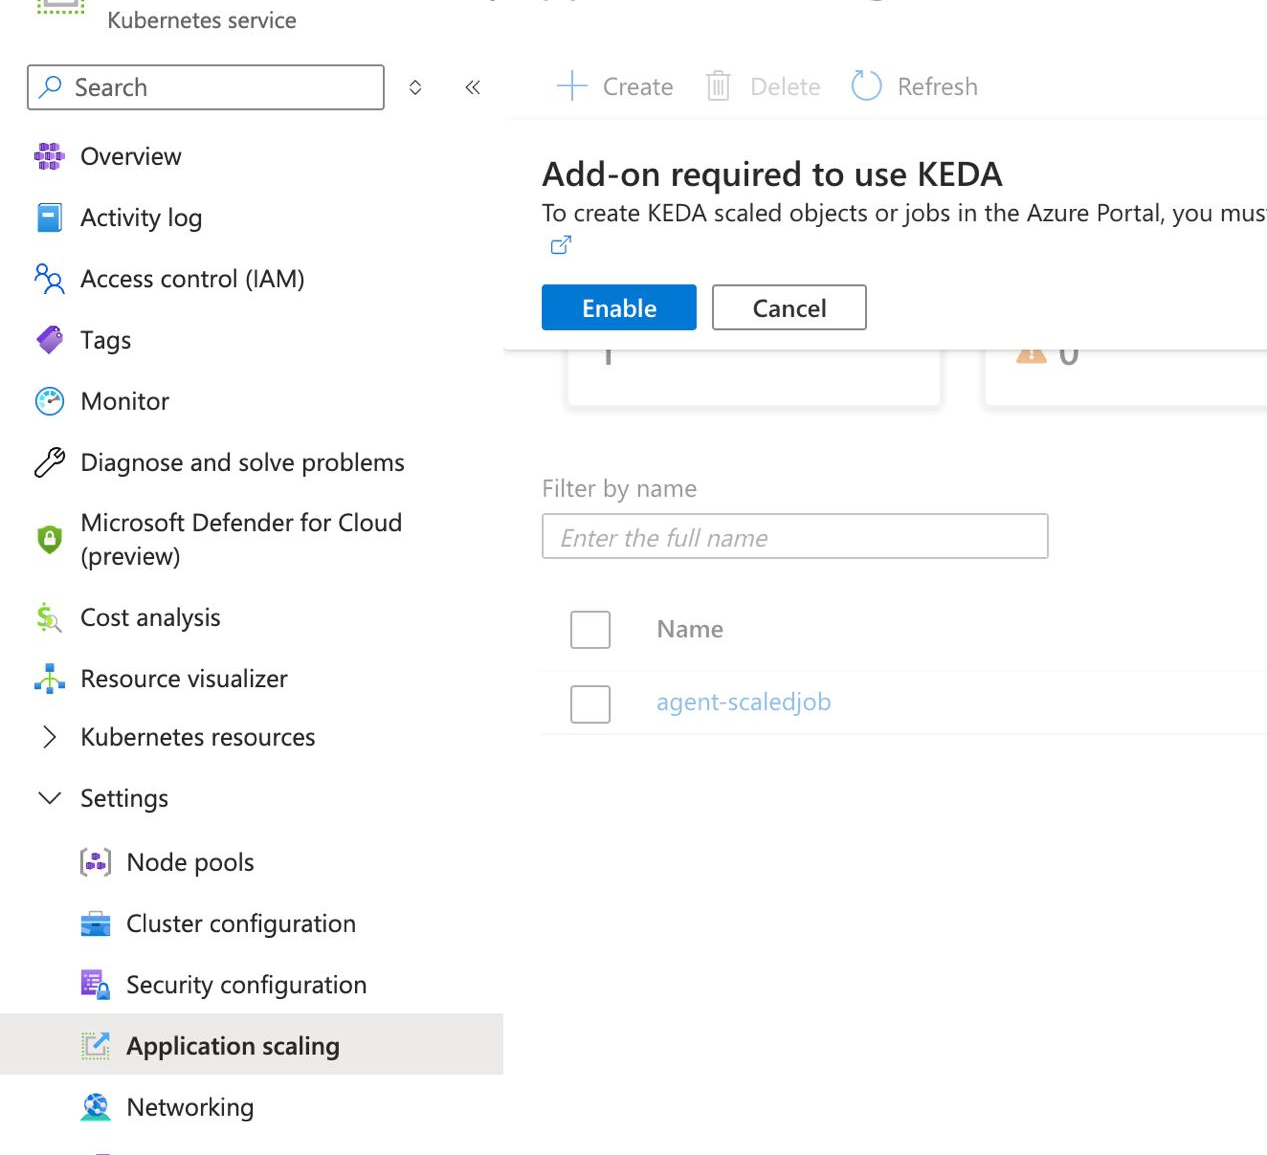
To streamline build operations and ensure your self-hosted agents scale according to demand, I deployed them as pods within my AKS cluster and used KEDA to dynamically adjust the number of replicas. Before you follow along, make sure you have KEDA enabled on your AKS cluster. KEDA can be added to your Azure Kubernetes Service (AKS) cluster by enabling the KEDA add-on using an ARM template or Azure CLI. More details can be found in the KEDA on AKS documentation.
Building the Self-Hosted Agent Container Image
Since our pipeline requires building Docker containers inside a pod, we initially faced the classic challenge often referred to as “Docker in Docker”. In traditional setups, this isn’t a major hurdle — you typically just expose the host’s Docker socket to the container. However, with Kubernetes moving away from Docker to containerd (as of version 1.20 and later), exposing the Docker socket from an unprivileged container is no longer feasible. For more details on these changes and the limitations, refer to this Kubernetes blog post and the Container Runtime Interface overview.
We considered alternatives like Kaniko or Buildah for building container images within the cluster,
but these approaches would have introduced additional complexity into our setup. After reviewing the
article
Podman Inside Kubernetes by RedHat,
we decided to adopt Podman as our solution. Podman allows us to build container images in a
daemonless and rootless environment without the need to expose the Docker socket. We added the
package podman-docker to still be able to use Docker@2 tasks without any
further modifications.
Below is a sample Dockerfile that I used to build the container image for my self-hosted Azure Pipelines agent.
FROM ubuntu:24.04
ENV TARGETARCH="linux-x64"

RUN apt update
RUN apt upgrade -y

RUN DEBIAN_FRONTEND=noninteractive apt install -y -qq --no-install-recommends \
    git \
    jq \
    libicu74 \
    curl \
    software-properties-common \
    apt-transport-https \
    gnupg

# Azure CLI
RUN curl -sL https://aka.ms/InstallAzureCLIDeb | bash

# dotnet 8 sdk
# RUN add-apt-repository ppa:dotnet/backports
RUN apt install -y dotnet-sdk-8.0

# OpenJDK Java 21 SDK
RUN apt install -y openjdk-21-jdk

# Podman
RUN apt install -y podman fuse-overlayfs
VOLUME /var/lib/containers

# Enable Podman Docker compatibility
RUN apt install -y podman-docker
RUN touch /etc/containers/nodocker

# Kubectl
RUN curl -LO "https://dl.k8s.io/release/$(curl -L -s https://dl.k8s.io/release/stable.txt)/bin/linux/amd64/kubectl"
RUN install -o root -g root -m 0755 kubectl /usr/local/bin/kubectl

# Helm
RUN curl https://baltocdn.com/helm/signing.asc | gpg --dearmor | tee /usr/share/keyrings/helm.gpg > /dev/null
RUN echo "deb [arch=$(dpkg --print-architecture) signed-by=/usr/share/keyrings/helm.gpg] https://baltocdn.com/helm/stable/debian/ all main" | tee /etc/apt/sources.list.d/helm-stable-debian.list

RUN apt update
RUN apt install -y helm

WORKDIR /azp/
COPY ./start.sh ./
RUN chmod +x ./start.sh

RUN useradd -m -d /home/agent agent
RUN chown -R agent:agent /azp /home/agent

USER agent
# ENV AGENT_ALLOW_RUNASROOT="true"

ENTRYPOINT [ "./start.sh" ]
In the above Dockerfile, the base image provides the core functionalities for the
Azure Pipelines agent. The start.sh script (which you would create) is used to
configure the agent and register it with your Azure DevOps organization. Here is mine as an example:
#!/bin/bash
set -e

if [ -z "${AZP_URL}" ]; then
  echo 1>&2 "error: missing AZP_URL environment variable"
  exit 1
fi

if [ -z "${AZP_TOKEN_FILE}" ]; then
  if [ -z "${AZP_TOKEN}" ]; then
    echo 1>&2 "error: missing AZP_TOKEN environment variable"
    exit 1
  fi

  AZP_TOKEN_FILE="/azp/.token"
  echo -n "${AZP_TOKEN}" > "${AZP_TOKEN_FILE}"
fi

unset AZP_TOKEN

if [ -n "${AZP_WORK}" ]; then
  mkdir -p "${AZP_WORK}"
fi

cleanup() {
  trap "" EXIT

  if [ -e ./config.sh ]; then
    print_header "Cleanup. Removing Azure Pipelines agent..."

    # If the agent has some running jobs, the configuration removal process will fail.
    # So, give it some time to finish the job.
    while true; do
      ./config.sh remove --unattended --auth "PAT" --token $(cat "${AZP_TOKEN_FILE}") && break

      echo "Retrying in 30 seconds..."
      sleep 30
    done
  fi
}

print_header() {
  lightcyan="\033[1;36m"
  nocolor="\033[0m"
  echo -e "\n${lightcyan}$1${nocolor}\n"
}

# Let the agent ignore the token env variables
export VSO_AGENT_IGNORE="AZP_TOKEN,AZP_TOKEN_FILE"

print_header "1. Determining matching Azure Pipelines agent..."

AZP_AGENT_PACKAGES=$(curl -LsS \
    -u user:$(cat "${AZP_TOKEN_FILE}") \
    -H "Accept:application/json" \
    "${AZP_URL}/_apis/distributedtask/packages/agent?platform=${TARGETARCH}&top=1")

AZP_AGENT_PACKAGE_LATEST_URL=$(echo "${AZP_AGENT_PACKAGES}" | jq -r ".value[0].downloadUrl")

if [ -z "${AZP_AGENT_PACKAGE_LATEST_URL}" -o "${AZP_AGENT_PACKAGE_LATEST_URL}" == "null" ]; then
  echo 1>&2 "error: could not determine a matching Azure Pipelines agent"
  echo 1>&2 "check that account "${AZP_URL}" is correct and the token is valid for that account"
  exit 1
fi

print_header "2. Downloading and extracting Azure Pipelines agent..."

curl -LsS "${AZP_AGENT_PACKAGE_LATEST_URL}" | tar -xz & wait $!

source ./env.sh

trap "cleanup; exit 0" EXIT
trap "cleanup; exit 130" INT
trap "cleanup; exit 143" TERM

print_header "3. Configuring Azure Pipelines agent..."

./config.sh --unattended \
  --agent "${AZP_AGENT_NAME:-$(hostname)}" \
  --url "${AZP_URL}" \
  --auth "PAT" \
  --token $(cat "${AZP_TOKEN_FILE}") \
  --pool "${AZP_POOL:-Default}" \
  --work "${AZP_WORK:-_work}" \
  --replace \
  --acceptTeeEula & wait $!

print_header "4. Running Azure Pipelines agent..."

chmod +x ./run.sh

# To be aware of TERM and INT signals call ./run.sh
# Running it with the --once flag at the end will shut down the agent after the build is executed
./run.sh "$@" --once & wait $!
Configuring KEDA for Dynamic Scaling
The following is an example of a KEDA ScaledObject manifest that scales your self-hosted agent
deployment based on the demand observed via a custom trigger (for instance, checking the queue
length from Azure DevOps). Adjust the trigger configuration according to your monitoring mechanism.
In this example we use a secret AZP_TOKEN which is a Personal Access Token (PAT), more
on this later.
apiVersion: keda.sh/v1alpha1
kind: ScaledJob
metadata:
  name: agent-scaledjob
  namespace: azure-devops
spec:
  jobTargetRef:
    template:
      spec:
        containers:
        - name: agent-job
          image: <ACR_NAME>.azurecr.io/azuredevops-agent:latest
          imagePullPolicy: Always
          env:
          - name: AZP_URL
            value: https://dev.azure.com/<ORGA_NAME>
          - name: AZP_POOL
            value: <CLUSTER_NAME>
          - name: AZP_TOKEN
            valueFrom:
              secretKeyRef:
                name: agent-secret
                key: AZP_TOKEN
          volumeMounts:
          - mountPath: /home/agent/.local/share
            name: podman-storage
          securityContext:
            privileged: true
          resources:
            requests:
              memory: 256Mi
              cpu: 250m
            limits:
              memory: 1024Mi
              cpu: 1000m
        volumes:
        - name: podman-storage
          emptyDir: {}
  pollingInterval: 10
  successfulJobsHistoryLimit: 3
  failedJobsHistoryLimit: 5
  minReplicaCount: 1
  maxReplicaCount: 20
  triggers:
  - type: azure-pipelines
    metadata:
      poolName: <CLUSTER_NAME>
      organizationURLFromEnv: "AZP_URL"
      personalAccessTokenFromEnv: "AZP_TOKEN"
      activationTargetPipelinesQueueLength: "0"
Note: The trigger type azure-pipelines in the above spec is
illustrative. Depending on your implementation, you might be using a different trigger type (such
as a custom HTTP or Prometheus trigger) to monitor the Azure DevOps queue. Refer to the
KEDA blog post on Azure Pipelines Scaler
for additional context on scaling Azure Pipelines agents with KEDA.
Example of a DevOps pipeline to “Build and Push”
As you can expect, given you have a proper Service Connection of Container Registry type in your
Azure DevOps Project (we use Workload Identity Federation to authenticate our agents), the usual
Docker@2 tasks will fit our needs.
[...]
steps:
  - task: Docker@2
    displayName: Login to ACR
    inputs:
      command: login
      containerRegistry: ${{ parameters.dockerRegistry }}
  - task: Docker@2
    displayName: 'Docker Build and Push'
    inputs:
      repository: '${{ parameters.appName }}'
      command: 'buildAndPush'
      tags: |
        $(Build.BuildId)
        latest
[...]
Pushing Your Helm Chart to an OCI Registry
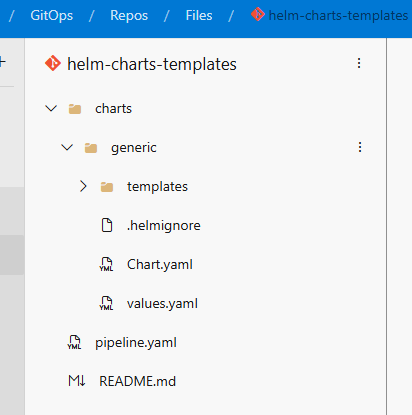
Before deploying your applications, you’ll need to create your Helm chart and push it to your private ACR OCI registry. As a starting point, we used the Stakater Application template, which provides a well-organized structure for Helm charts.
To run the following pipeline you will need a Service Connection of type Azure Resource Manager (ARM) for the resource group your Azure Container Registry is deployed in.
trigger:
  branches:
    include:
      - main

variables:
  ACR_NAME: <ACR_NAME>
  CHARTS_DIRECTORY: 'charts'

pool: <SELFHOSTED_POOL_NAME>

stages:
- stage: BuildAndPushHelmCharts
  displayName: 'Build and Push Helm Charts to ACR'
  jobs:
  - job: HelmPush
    displayName: 'Package and Push Helm Charts'
    steps:
    - task: AzureCLI@2
      displayName: 'Login to ACR and Helm Registry and publish charts'
      inputs:
        azureSubscription: <ARM_SERVICE_CONNECTION>
        scriptType: bash
        scriptLocation: inlineScript
        inlineScript: |
          helm version

          USER_NAME="00000000-0000-0000-0000-000000000000"
          PASSWORD=$(az acr login --name $(ACR_NAME) --expose-token --output tsv --query accessToken)

          echo $PASSWORD | helm registry login $(ACR_NAME).azurecr.io \
            --username $USER_NAME \
            --password-stdin

          for chart in $(find $(CHARTS_DIRECTORY) -maxdepth 1 -mindepth 1 -type d); do
            CHART_NAME=$(basename "$chart")
            CHART_VERSION=$(grep '^version:' "$chart/Chart.yaml" | awk '{print $2}')
            echo "Checking if chart exists: $CHART_NAME:$CHART_VERSION"
            EXISTS=$(az acr repository show-tags --name $(ACR_NAME) --repository helm/$CHART_NAME --output tsv | grep -w "$CHART_VERSION" || echo "")
            if [ -n "$EXISTS" ]; then
              echo "Chart $CHART_NAME:$CHART_VERSION aready exists in ACR. Skipping push."
            else
              echo "Packaging and pushing chart: $CHART_NAME:$CHART_VERSION"
              helm package "$chart" --version "$CHART_VERSION"
              helm push "$CHART_NAME-$CHART_VERSION.tgz" oci://$(ACR_NAME).azurecr.io/helm
              fi
          done
Deploying the Application Image Using the Chart in the OCI Registry
With your Helm chart successfully pushed to your private ACR OCI registry, the final step is
deploying your built application image. This step leverages the chart to configure and run your
application on your AKS cluster. We expect the application repositories to have a
values.{ENV_NAME}.yaml in the root of their repository to target different clusters:
dev, production, and so on.
Our pipeline runs automatically after a successful merge to main branch and looks
something like the following:
steps:
  - task: AzureCLI@2
    displayName: Deploy to DEV
    inputs:
      azureSubscription: ${{ parameters.ARM_NAME }}
      scriptType: bash
      scriptLocation: inlineScript
      inlineScript: |
        helm version

        az aks get-credentials \
          --resource-group ${{ parameters.RSG_NAME }} \
          --name ${{ parameters.CLUSTER_TEST }} \
          --overwrite-existing

        USER_NAME="00000000-0000-0000-0000-000000000000"
        PASSWORD=$(az acr login --name ${{ parameters.ACR_NAME }} --expose-token --output tsv --query accessToken)

        echo $PASSWORD | helm registry login ${{ parameters.ACR_NAME }}.azurecr.io \
          --username $USER_NAME \
          --password-stdin

        helm upgrade \
          --namespace ${{ parameters.namespace }} \
          --install \
          --values $(System.DefaultWorkingDirectory)/values.dev.yaml \
          --wait \
          --namespace ${{ parameters.namespace }} \
          ${{ parameters.releaseName }} \
          oci://${{ parameters.ACR_NAME }}.azurecr.io/helm/generic \
          --version ${{ parameters.HELM_VERSION }}
First of all you need to authenticate kubectl and helm with the AKS
cluster, then you need to use the ARM (Azure Resource Manager) service connection to authenticate
the helm registry (Azure Container Registry). Only at that point you can run a
helm upgrade --install to install/upgrade your application.
Additional Considerations
During the process, we encountered some interesting trade-offs and decisions:
-
Agent Container Configuration:
Our agent container image was built to include both Java OpenJDK and .NET SDK. This setup allows
us to run SonarQube analysis tasks, supporting both .NET projects via
dotnetandCLIscanner modes. -
HelmDeploy Tasks with OCI Private Registries:
We found that tasks of type
HelmDeploy@1don’t integrate smoothly with OCI private registries. As a workaround, we implemented deployments entirely through Bash scripts. While this approach works well for us, it raises the question: is this a true limitation of the task, or merely a temporary hurdle pending further improvements from the community or Microsoft? Your mileage might vary, and it’s worth monitoring updates in this space: Push and pull Helm charts to an Azure container registry. - Authentication via Service Principals: Both KEDA and our self-hosted agents are currently running using Personal Access Token instead of Service Principals. This approach doesn’t yet adhere to best practices by using dedicated identities for automation, but fortunately, both KEDA and Azure DevOps agents support service principal registration effectively and we’ll look into improving this authentication mechanism in the near future. More details on these configurations can be found in the KEDA scaler documentation for Azure Pipelines and the Azure DevOps service principal registration guide.
Final Thoughts
Building this infrastructure required integrating several cutting-edge tools and technologies to create a secure, scalable CI/CD pipeline. From deploying a private AKS cluster with a dedicated ACR and using self-hosted agents that scale with KEDA, to handling container builds with Podman and managing Helm charts in an OCI registry, each component plays a vital role. While there are some nuances — like the current limitations with the HelmDeploy task — the overall architecture delivers robust performance and flexibility.
I hope this article provides useful insights and a practical reference as you build and optimize your own containerized CI/CD pipelines. Happy deploying 🎉